WHMCS module Welcome Email template update

The OnePortal module for WHMCS update includes a "OnePortal Welcome" email template to replace the default WHMCS "Dedicated/VPS Server Welcome Email." The default template included in WHMCS assumes that all servers are licensed with WHM. This white-label template included in the OnePortal module update works with any server.
Adding the OnePortal Welcome replacement template
- In WHMCS Admin, navigate to Setup->Email Templates
- Create New Email Template Type: Product/Service
- Name the template "OnePortal Welcome" or another Unique Name
- Enter a subject of "New Server Information" or similar
- Click "Enable/Disable Rich-Text Editor" so that rich-text is disabled
- Open the oneportal_welcome_text.txt file
- Copy and paste the plain text from oneportal_welcome_text.txt into the new email
- Save Changes
- If you have already created the products in WHMCS for the OnePortal module:
- For each server, in Setup->Products/Services->Products/Services, select to edit the product
- In the Details tab, change the Welcome Email to "OnePortal Welcome" or the unique name you created for the new template
- Save Changes
- If you have not yet created the products in WHMCS:
- When creating each server, under the Details tab, ensure that "OnePortal Welcome" or the unique name of the new template is selected
Ensuring the Merge Fields are filled correctly on the template (additional required steps for WHMCS 6.2 or earlier)
- For each dedicated server or cloud server you sell through the OnePortal WHMCS module, create a server in Setup->Products/Services->Servers->Add New Server
- For Name, enter whatever you would like (easiest to enter server Hostname)
- For Hostname, enter the server Hostname
- For IP Address, enter the primary IP Address of the server
- For Assigned IP Addresses, enter all of the IP Addresses of the server, including the primary IP Address (one per line)
- Monthly Cost, Datacenter/NOC, and Server Status Address are optional fields (they are irrelevant to the email template)
- Maximum No. of Accounts is recommended to be "1"
- Fill in the Primary Nameserver and Secondary Nameserver fields
- In Server Details, for Type, choose Oneportal
- Username -- "root"
- Password -- enter root password of server
- Save Changes
- Go to the Client Profile for your new server order, under the Products/Services tab
- For Server, select the server created in Step 1 from the dropdown list
- Save Changes
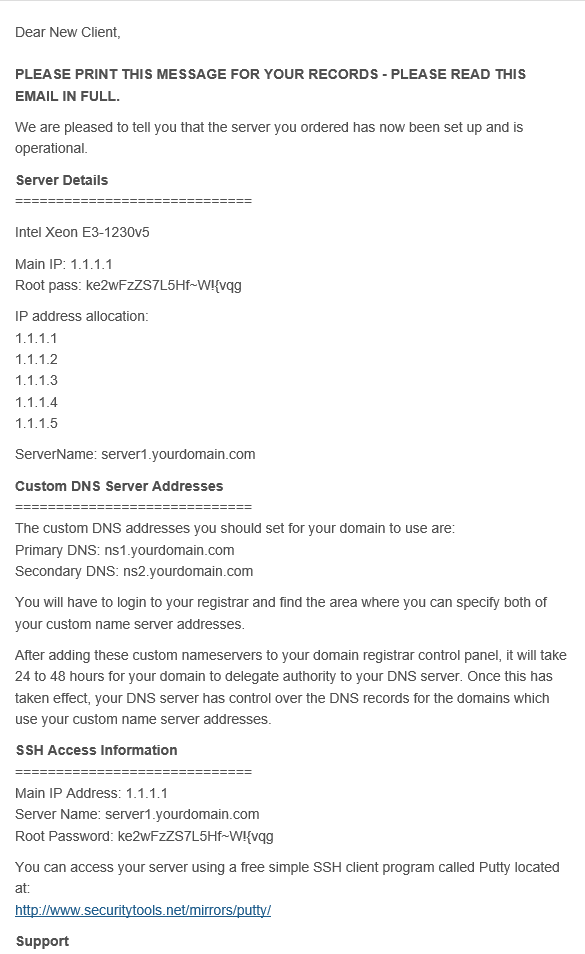
Now the product welcome email will appear similar to: